Author Topic: Keithley 616 teardown  (Read 14982 times)

0 Members and 1 Guest are viewing this topic.

Offline muvideoTopic starter

  • Frequent Contributor
  • **
  • Posts: 418
  • Country: it
Keithley 616 teardown
« on: June 25, 2014, 08:12:04 pm »
Hello,
I recently added to my equipment collection an electrometer. I was searching for one just for
the fun of having one, but the prices on ebay were a bit on the high side also for old units,
and I really dont need it but when I saw one for cheap I couldnt resist.
Here is it, in all his glory, a keithley 616:


It is pretty old, probably around late 70' and the unit had some problems, I knew before buying it,
since in the pics on the auction the 616 had the display that was not zero, while all the controls
were set for obtaining a zero reading.
Once arrived the problem was confirmed: the unit was showing a constant reading offset of
180-200 counts. I was hoping that all the input circuitry was intact, this
thing is full of strange and unobtainable devices, and the input stage is where most
of the magic happens.
Fast check of the power supply levels, and there is it: -275V rail was indicating -144V with
huge ripple, so that rail was missing it's filtering. I removed the electrolitics and the
culprit was evident:

Once changed the HV electros the unit was working again:
« Last Edit: June 27, 2014, 08:25:07 pm by muvideo »
Fabio Eboli.
 
The following users thanked this post: Kean

Offline muvideoTopic starter

  • Frequent Contributor
  • **
  • Posts: 418
  • Country: it
Re: Keithley 616 teardown
« Reply #1 on: June 25, 2014, 08:13:10 pm »
An electrometer is 'just' a voltmeter with a high input impedance, and in this case high
means really high. This enables this kind of instrumets to make measurements otherwise
impossible. Other than measuring voltage of devices with high output impedance,
they are useful for measure very low currents or very high resistances.

The working principle of 616 is simple, the first stage is a 1:1 buffer followed by a variable
gain amplifier that feeds the integrating ADC of an autoranging voltmeter. Full scale is 2000 counts.
The buffer output is routed to the back of the instrument, and the specs tell that it will
settle at less than 20ppm of input voltage, so it could be connected to a better meter.
The buffer is reconfigurable to perform voltage, current (shunt or feedback),
resistance and charge measurements.

And now let's take a look inside:

it's very clean, the black box is the input transformer, around it there are
filtering capacitors and voltage regulators. On the bottom there are logic and A/D boards
while on the top, under the aluminium shielding, there is the input preamplifier and
range selector. The two canned HV transistors between the shielding and the transformer
are part of the 1:1 buffer, and are used to generate the X1 output, that is a 1:1
buffered representation of the input voltage seen by the instrument, up to +-200V.
Another view:


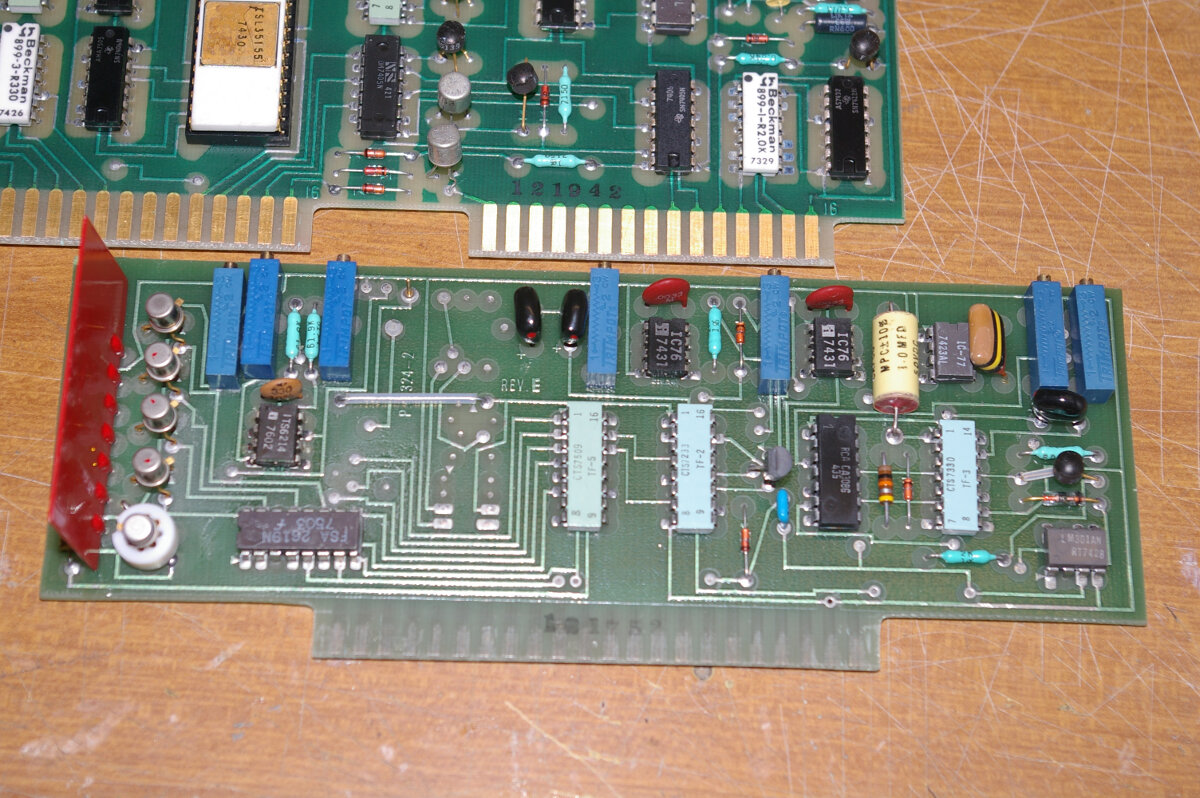
This is the logic board, the white chip is the “brain” of the autoranging meter and ADC,the
rest is the display driving logic


This is the ranging board, fet switches and caddock resistance network perform the variable
gain amplifier function, while the socketed device on the bottom is a dual jfet


This is a closeup of the PSU section:
« Last Edit: June 27, 2014, 08:30:22 pm by muvideo »
Fabio Eboli.
 

Offline muvideoTopic starter

  • Frequent Contributor
  • **
  • Posts: 418
  • Country: it
Re: Keithley 616 teardown
« Reply #2 on: June 25, 2014, 08:13:35 pm »
This part is the range selector and preamplifier, the input goes to two thermally
coupled mosfets, trough teflon standoff mounts, leakage here is to be
absolutely avoided, the bigger can contains two diode connected transistors that protect
the mosfets.


The range selector connects to the input one of 11 resistors that go from 9.99ohm to 10^11ohm
and 11 capacitors from 5pf to 100nF


Teflon insulated side of selector


On the bottom of the selector can be seen some glass encapsulated high values
resistances,


On the side of the selector there is a reed switch used to short the input for the zero preset.
« Last Edit: June 27, 2014, 08:32:43 pm by muvideo »
Fabio Eboli.
 

Offline muvideoTopic starter

  • Frequent Contributor
  • **
  • Posts: 418
  • Country: it
Re: Keithley 616 teardown
« Reply #3 on: June 25, 2014, 08:14:05 pm »
Just to put in perspective things I put a charged capacitor
on the terminals of the 616 and a keithley 2015  to measure the voltage. The 2015
has pretty high input impedance in the order of Gohms, but the 100nF capacitor is
rapidly discharged by the input leakage current of the instrument:


The 616 input shows a very slow decrease in voltage, and this is probably dominated
by internal capacitor leakage, since once disconnected the 100nF cap, the residual input
capacitance (should be around 20pF) of the 616 is enough to keep the reading near
last input value.


I tried another more quantitative experiment, I connected a voltage source to a 100MOhm resistor string and tried to measure the current trough it


This is the result with 10mV on it, the current will be around I=V/R=.01/100*10^6 =1*10^-10 A,
that is 100pA


At 1mV the current is down to 10pA, the 480 picoammeter is at it's limits while 616 is still at full range, readings start become noisy


Now a zero check to null out current generated by thermocouples


at 100uV we are around 1pA, 480 is useless, while the electrometer is still a pair of decades
away from it's limits (theoretically 10^-15A of resolution). At these levels the reading is very noisy,
and the sensivity so high that I had to stand still between the readings, otherwise the numbers
were moving all around. It's a good result, cosidering that I didnt connect guard or shields


Now I need some cabling, is there a reasonably cheap solution to build a cable for the
electrometer? It's socket is a triax with 2 180° pins.
« Last Edit: June 27, 2014, 08:46:16 pm by muvideo »
Fabio Eboli.
 

Offline JuiceKing

  • Regular Contributor
  • *
  • Posts: 233
  • Country: us
Re: Keithley 616 teardown
« Reply #4 on: June 26, 2014, 12:43:33 pm »
Great stuff! Thanks so much for posting.
 

Offline tautech

  • Super Contributor
  • ***
  • Posts: 29506
  • Country: nz
  • Taupaki Technologies Ltd. Siglent Distributor NZ.
    • Taupaki Technologies Ltd.
Re: Keithley 616 teardown
« Reply #5 on: June 26, 2014, 02:39:10 pm »
WOW Not bad for a cheapy.  :clap:
Avid Rabid Hobbyist.
Some stuff seen @ Siglent HQ cannot be shared.
 

Offline Vgkid

  • Super Contributor
  • ***
  • Posts: 2727
  • Country: us
Re: Keithley 616 teardown
« Reply #6 on: June 26, 2014, 05:45:17 pm »
Thanks for the teardown.
Muvideo: How is your 7075 doing?
If you own any North Hills Electronics gear, message me. L&N Fan
 

Offline muvideoTopic starter

  • Frequent Contributor
  • **
  • Posts: 418
  • Country: it
Re: Keithley 616 teardown
« Reply #7 on: June 26, 2014, 08:08:47 pm »
Hello,
my 7075 is "almost" ok, almost because it works ok for few hours,
then suddently stops working, seem thermally related.
I didnt had time to troubleshoot it.
Now I'm living and working far away from my home lab, so I have
very little time to play with my toys :)
Fabio Eboli.
 

Offline robrenz

  • Super Contributor
  • ***
  • Posts: 3035
  • Country: us
  • Real Machinist, Wannabe EE
Re: Keithley 616 teardown
« Reply #8 on: June 26, 2014, 08:17:14 pm »
Very nice find and pictures.   Try adding ;image after the picture data in your img  to have the pictures show.
Code: [Select]
[img]picturedata;image[/img]

Offline muvideoTopic starter

  • Frequent Contributor
  • **
  • Posts: 418
  • Country: it
Re: Keithley 616 teardown
« Reply #9 on: June 27, 2014, 08:52:50 pm »
Very nice find and pictures.   Try adding ;image after the picture data in your img  to have the pictures show.
Code: [Select]
[img]picturedata;image[/img]

Thank you robrenz, i tried adding ";image" , what is the difference? On my pc seem the same.
Fabio Eboli.
 

Offline free_electron

  • Super Contributor
  • ***
  • Posts: 8550
  • Country: us
    • SiliconValleyGarage
Re: Keithley 616 teardown
« Reply #10 on: June 27, 2014, 10:59:16 pm »
ghaaaa . you removed the input buffer ... i hope you didn't touch it with greasy fingers....

that dual mos used as protection and the matched pair jfet are pure unobtainium ...
Professional Electron Wrangler.
Any comments, or points of view expressed, are my own and not endorsed , induced or compensated by my employer(s).
 

Offline muvideoTopic starter

  • Frequent Contributor
  • **
  • Posts: 418
  • Country: it
Re: Keithley 616 teardown
« Reply #11 on: June 28, 2014, 07:09:06 am »
ghaaaa . you removed the input buffer ... i hope you didn't touch it with greasy fingers....

 ;D

dont worry, no bare fingers were allowed near the preamp or range selector,
and the board was extracted by the edges
Fabio Eboli.
 

Offline mimmus78

  • Supporter
  • ****
  • Posts: 676
  • Country: it
Re: Keithley 616 teardown
« Reply #12 on: June 29, 2014, 08:17:57 pm »
Thanks for the nice post(s).
 

Offline anjan

  • Newbie
  • Posts: 2
Re: Keithley 616 teardown
« Reply #13 on: December 15, 2014, 11:55:56 pm »
Hi,

Can you tell me how to measure charge from this electrometer ? I mean the step by step procedure.

Thanks
 

Offline Ordinaryman1971

  • Frequent Contributor
  • **
  • Posts: 323
  • Country: us
Re: Keithley 616 teardown
« Reply #14 on: May 08, 2018, 01:58:43 pm »
Wanted to ask if anybody knows the alternative for the 28pin Dip IC used in the Keithley 616. It's a display driver/decoder legend QA408, Keithley part number: LSI-2, it's made by Fairchild SL35155, the ceramic package.
I was looking for datasheet for this one and I can't find any, any known replacements, any way to hack it?
 

Offline Ordinaryman1971

  • Frequent Contributor
  • **
  • Posts: 323
  • Country: us
Re: Keithley 616 teardown
« Reply #15 on: May 09, 2018, 03:54:11 pm »
Just wanted to share a quote I've received for ADC for Keithley 616. It's a absolutely obsolete part from Frairchild.
I guess they are made out of unobtanium.
 

Offline Joel_S

  • Newbie
  • Posts: 8
  • Country: fr
Re: Keithley 616 teardown
« Reply #16 on: March 19, 2020, 06:27:58 pm »
Hello everyone, !

Great teardown, thanks !
I just got a Keithley 616 which needed some serious repairs, and it is now back to full functionality.
As I'm always scared about using unobtainum-based instruments, and after seeing the $799 quote for the LSI-2 chip which is the core of the logic board, I decided to build a replacement.
I used a 68HC811 which I happened to have on hand, and it turned out to be an easy task. I now have a neat little PC board which plugs into the LSI-2 socket, and the K616 works exactly as it did with the original chip.
If anyone is interested, just let me know !
Joel


Share me

Digg  Facebook  SlashDot  Delicious  Technorati  Twitter  Google  Yahoo
Smf