Author Topic: Different die pictures  (Read 108177 times)

0 Members and 2 Guests are viewing this topic.

Online iMo

  • Super Contributor
  • ***
  • Posts: 4896
  • Country: vc
Re: Different die pictures
« Reply #275 on: February 25, 2023, 11:15:13 am »
One of my first projects at DEC was a DEC AlphaServer 8000 installation (afaik w/ six Alpha 21164 processors) at a local electricity distributor..
Hopefully Noopy gets the Alpha chips in his hands too..
 

Offline Gyro

  • Super Contributor
  • ***
  • Posts: 9737
  • Country: gb
Re: Different die pictures
« Reply #276 on: February 25, 2023, 01:34:22 pm »
I used to have a very small portion of a DEC Alpha wafer (about 2 1/2 dies) from a complete wafer that got smashed on its luggage trip from the US. Unfortunately I dropped it on the carpet in my den fairly recently and accidentally rolled my chair over it!  :(

Does anyone else remember Alpha launch day? They swapped all of the plastic cups in the vending machines for commemorative Alpha printed ones. I think I kept one somewhere, thinking it might be worth money one day!
« Last Edit: February 25, 2023, 02:22:15 pm by Gyro »
Best Regards, Chris
 

Offline NoopyTopic starter

  • Super Contributor
  • ***
  • Posts: 1824
  • Country: de
    • Richis-Lab
Re: Different die pictures
« Reply #277 on: February 25, 2023, 07:46:41 pm »


I nearly missed the dog... ...well, you have to know that it is a dog...  ::)


https://www.richis-lab.de/cpu04.htm#dog

 :-/O
 
The following users thanked this post: RoGeorge

Online iMo

  • Super Contributor
  • ***
  • Posts: 4896
  • Country: vc
Re: Different die pictures
« Reply #278 on: February 26, 2023, 09:18:44 pm »
Besides the widely used microprocessor Z80 Zilog also produced the microcontroller Z8. In the GDR, the U88xx series had been developed, which functioned like the Z8. The U88xx was still based on an n-channel silicon gate process. From this, the U840 was developed in the Funkwerk Erfurt, which was based on a CMOS process and thus had a significantly reduced power consumption. The document above comes from the Thuringian Museum of Electrical Engineering (https://www.elektromuseum.de/) and shows the basic specifications of the U840..
A video about the GDR microelectronics troubles..

 
The following users thanked this post: Gyro, Noopy

Offline NoopyTopic starter

  • Super Contributor
  • ***
  • Posts: 1824
  • Country: de
    • Richis-Lab
Re: Different die pictures
« Reply #279 on: February 26, 2023, 09:28:53 pm »


The MicroVAX II computer system was rebuilt in the GDR. For this purpose, the MME (Mikroelektronik Karl Marx) analyzed the CPU DEC 78032 and rebuilt it under the designation U80701. However, the design was never put into serial production.

Here you can see a U80701 in one of the then common plastic carriers. Four clamps are locking the outer pins. The pins are not yet bent into shape.


Like the 78032, the U80701 was put into a ceramic package with 68 pins.


In contrast to the 78032, a very short datasheet exists for the U80701. It bears the note "In development". This probably explains why the pin assignment is not 100% correct. Here, the substrate potential Ubb is located in the lower left corner. In fact, however, it is connected in the lower right corner, just like in the 78032.


While opening the case, some pins broke out. Basically, the U80701 is constructed in the same way as the 78032. The substrate potential is connected directly from the corresponding pin to the carrier. An additional contact cuboid has been omitted here.


The dimensions of the die are 8,9mm x 8,8mm. It is about the same size as the die of the 78032. Just the remaining edge area of the U80701 is narrower. The image shown here is available in higher resolution (96MB): https://www.richis-lab.de/images/cpu/06x06XL.jpg

Superficially, the only difference to the 78032 is a slightly different arrangement of the bondpads. But only the distances were chosen differently, the sequence of the signals did not change.


There is some dirt or corrosion on the die. That may be due to the fact that these are relatively old prototype parts.


As in 78032, there is a structure looking like a dog.


Apart from the arrangement of the bondpads, there is just one difference between the U80701 and the 78032. In the left area of the die, approximately in the middle, there is a wide bus, which contains significantly fewer lines in the U80701. The structure to the left of this, probably a decoder matrix, is also simpler in design. This is the area that DEC in the Digital Technical Journal calls the M-Box.


https://www.richis-lab.de/cpu06.htm

 :-/O
 
The following users thanked this post: SeanB, Gyro, RoGeorge, iMo

Offline Gyro

  • Super Contributor
  • ***
  • Posts: 9737
  • Country: gb
Re: Different die pictures
« Reply #280 on: February 26, 2023, 10:17:10 pm »
Internal folklore had it that one of the DEC dies has a little 'Joker' playing card on the corner with 'Only copy the best' in cyrillic text underneath. I had a feeling that it was MicroVAX [1?] but it could well have been one of the MicroPDPs or indeed Alpha, but I think it pre-dated that.


EDIT: Ah, it was CVAX, but I nearly got the quote right - I don't see the Joker though, maybe there was more than one...  https://commons.wikimedia.org/wiki/File:CVAX_When_You_Care_Enough_To_Steal_The_Very_Best.svg
« Last Edit: February 26, 2023, 10:24:46 pm by Gyro »
Best Regards, Chris
 

Offline NoopyTopic starter

  • Super Contributor
  • ***
  • Posts: 1824
  • Country: de
    • Richis-Lab
Re: Different die pictures
« Reply #281 on: February 26, 2023, 10:29:20 pm »
Internal folklore had it that one of the DEC dies has a little 'Joker' playing card on the corner with 'Only copy the best' in cyrillic text underneath. I had a feeling that it was MicroVAX [1?] but it could well have been one of the MicroPDPs or indeed Alpha, but I think it pre-dated that.

It´s a successor, the MicroVAX3300 with the CPU "CVAX".
Coming soon...  ;D
 
The following users thanked this post: Gyro

Offline quadtech

  • Regular Contributor
  • *
  • Posts: 62
  • Country: in
Re: Different die pictures
« Reply #282 on: February 27, 2023, 09:39:13 am »
Noopy, I want to convey my thanks for the fantastic contributions from you on this and other die shot threads.
It is a compendium of electronics history and a terrific corpus of work for future reference.

Looking at your pictures, it is so amazing that human creativity and ingenuity can come up with so
many variations on say a 2N2222 or a 2N3055, while still achieving parity with all specs.
It is like a Gaudi architecture vs the Pyramids, both being buildings (and beautiful at that), but with such different approaches,
or the creations of Jonathan Ive vs Dieter Rams, separated in time and place, just like Soviet or East German transistor clones of 2N3055, say.

I spent 35 years of life in a totally unrelated field , but I find there is something "beautiful" about these die shots, even if I don't understand a lot of it.
Many/most people cannot appreciate engineering design as art and achievements of human creativity, be it a bridge or a chip, but I feel
it is only a reflection on their aesthetic sense / the eye of the beholder.
« Last Edit: February 27, 2023, 09:46:47 am by quadtech »
 
The following users thanked this post: SeanB, Noopy

Offline NoopyTopic starter

  • Super Contributor
  • ***
  • Posts: 1824
  • Country: de
    • Richis-Lab
Re: Different die pictures
« Reply #283 on: February 27, 2023, 11:11:41 am »
Thank you quadtech!
I still have a lot of fun taking the pictures.  8)

I also like the quantity going up. My website develops to some kind of encyclopedia hopefully helping a lot of people interested in the internals of the semiconductors.

It´s definitely art.  :-+
 
The following users thanked this post: MegaVolt

Offline NoopyTopic starter

  • Super Contributor
  • ***
  • Posts: 1824
  • Country: de
    • Richis-Lab
Re: Different die pictures
« Reply #284 on: March 01, 2023, 04:11:08 am »
A developer involved in the U80701 was able to provide some explanations and background information on the U80701:

The U80701 is a 1:1 replica of the 78032. The manufacturing process available in the GDR was sufficiently in almost all points. Only contacts between the polysilicon layer and the active areas required a 1µm larger distance. This circumstance required some minor adjustments.

Another difference between the 78032 and the U80701 was that the layout ERC (Electrical Rule Check) found fault with long stubs. During production, such stubs can trap charges. Plasma etching, which naturally generates a lot free charges, is particularly critical in this respect. Depending on the design of the structures, this can result in damage to the gate structures. In the GDR they shortened some lines that wasn´t necessary.

The first design of the U80701 did not work properly. It turned out that people in Voronezh (Russia) were also working on a replica of the 78032. In the collaboration, it turned out that the U80701 had a connection between the two metal layers that was not present in the original. Without this contact, however, the ERC delivered an error (transistor finger not connected). Eventually, the connection was cut and the CPU worked as desired. Since DEC sometimes even have put cyrillic messages on their integrated circuits, perhaps that was a little trap.  >:D


https://www.richis-lab.de/cpu06.htm#background

 :-/O
 
The following users thanked this post: SeanB, RoGeorge

Offline NoopyTopic starter

  • Super Contributor
  • ***
  • Posts: 1824
  • Country: de
    • Richis-Lab
Re: Different die pictures
« Reply #285 on: March 02, 2023, 12:04:26 pm »


The U80703 is a replica of the DEC 78132, which was developed in the MME (Mikroelektronik Karl Marx). Like the CPU U80701 the U80703 never went into series production.

The U80703 here is in one of the plastic carriers that were common at the time. It is obviously a development model. Judging by the surfaces, the device was never sealed. The pins are not coated except for the bond areas. The surface is partially corroded. The backside shows that it is a defective part. The number in the upper area could stand for the batch out of which this chip was taken.


Some of the bondwires are badly damaged. This could have been caused by the unprotected storage. However, the bond process may also not have been set appropriately for this component.


The dimensions of the die are 8,3mm x 6,5mm. It is about the same size as the die of the 78132. The remaining edge areas of the U80703 are narrower. The image shown here is also available in higher resolution (125MB): https://www.richis-lab.de/images/cpu/07x04XL.jpg


Due to the open storage, the die is quite dirty and slightly damaged. Cleaning was dispensed with in order not to further damage the bondwires.


In the upper right corner, where the copyright is displayed on the 78132, the U80703 has a small silicon art that appears profound. On the left, one has integrated a clock that shows 7 minutes to 12. To the right, a stick figure holds the house of a snail. What the element above the snail's shell means remains unclear. It could be a crane.  :-//


At the bottom edge of the die there are two large transistors, each connected to a bondpad. In the 78132 just the right contact is connected to a pin of the package. In the U80703 both potentials are connected to the outside. Since the functions of most of the pins are unknown, it is impossible to say what advantage the availability of this additional potential had.


As between 78032 and U80701, there are minor differences in the structures between 78132 and U78132 too. The reason for this is, as described in U80701, minimally differences in the design rules.


https://www.richis-lab.de/cpu07.htm

 :-/O
 
The following users thanked this post: SeanB, mister_rf, RoGeorge

Offline NoopyTopic starter

  • Super Contributor
  • ***
  • Posts: 1824
  • Country: de
    • Richis-Lab
Re: Different die pictures
« Reply #286 on: April 11, 2023, 07:47:41 pm »


At events such as marathons, athletes' lap times are often determined using RFID transponders ("RFID tags"). The transponders come in various forms. For example, they can be threaded into shoelaces as a small plastic element. Here at the Leipzig Triathlon, the RFID transponder is attached to the start number.


The imprint on the transponder reveals that it is a system from the company Race Result.


With the above picture Race Result explains the structure of the system on the company website. The transponder of the active system has its own power supply and thus offers a bit more functionality. The passive system is cheaper and is based on RFID transponders that work with a radio frequency of 866MHz.


If you remove the plastic element from the start number, the antenna structure on the back of the transponder becomes visible. The purpose of the numbers and markings remains unclear.


The integrated circuit is located in the center of the element above the four small squares. The different trace widths in the immediate vicinity of the circuit represent an impedance match.


The integrated circuit, which is located behind the traces, can only be seen at high magnification.


The circuit is embedded in a fiber material. After removing the fiber material the IC with its edge length of 0,48mm becomes visible. It is a flip chip, which makes direct contact between its active side and the metal traces. A transparent potting stabilizes the circuit on the circuit carrier.


If one tries to thermally decompose the carrier structure, remnants of the conductive traces remain attached to the circuit. The conductive tracks are most likely made of aluminum, as they dissolve quickly in hydrochloric acid. What remains is the circuit, to which a considerable amount of coating still adheres.


After treatment with elevated temperatures, even the remains of the protective layer can be removed. You can clearly see that the two connections of the antenna are contacted by one large and one small metal surface each.


A large structure is integrated between the two contacts on the left. Probably the radiated energy is absorbed via these contacts and converted into a usable supply. The special rectifiers for this application partly form such structures. It could be that the antenna is also attenuated via the large contacts, allowing information to be transmitted back to the transmitter.

The smaller contacts could represent a receiver input isolated from the power section. For many RFID transponders, it is sufficient if they transmit an ID when stimulated, i.e. supplied with power. However, the transponder here can also be programmed, which means that it must be able to receive data.

A logic structure can be clearly seen in the upper right area.


https://www.richis-lab.de/transponder04.htm

 :-/O
 
The following users thanked this post: SeanB, RoGeorge

Online RoGeorge

  • Super Contributor
  • ***
  • Posts: 6448
  • Country: ro
Re: Different die pictures
« Reply #287 on: April 12, 2023, 09:51:00 am »
What distance resolution would that have?  Sometimes the athletes arrive at the finish line at a distance of only centimeters apart, what trick can give such a high positioning resolution to an RFID tag?

Offline eliocor

  • Supporter
  • ****
  • Posts: 522
  • Country: it
    • rhodiatoce
Re: Different die pictures
« Reply #288 on: April 12, 2023, 02:29:26 pm »
With UWB, from 10 to 30cm
 

Offline NoopyTopic starter

  • Super Contributor
  • ***
  • Posts: 1824
  • Country: de
    • Richis-Lab
Re: Different die pictures
« Reply #289 on: April 12, 2023, 03:08:31 pm »
That´s an interesting question!

For the passive system I found these specifications:
Detection range is 4m and the system takes the point of maximum signal strength.
Timing accuracy is 200ms.
So if you are running with 10km/h. The timing accuracy alone gives you a distance accuracy of 56cm! That´s a lot!  :scared:

The active system gives you a timing accuracy of 10ms up to 150km/h. That is a distance accuracy of 2,8cm (running at 10km/h).
 
The following users thanked this post: RoGeorge

Offline NoopyTopic starter

  • Super Contributor
  • ***
  • Posts: 1824
  • Country: de
    • Richis-Lab
Re: Different die pictures
« Reply #290 on: May 03, 2023, 06:08:27 pm »


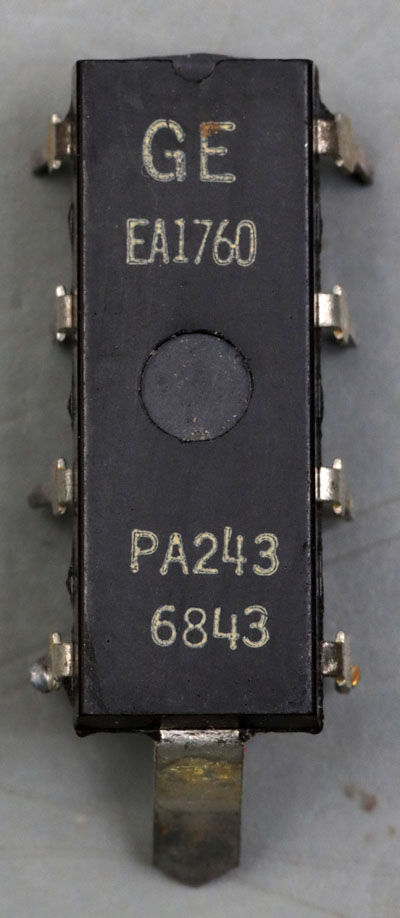
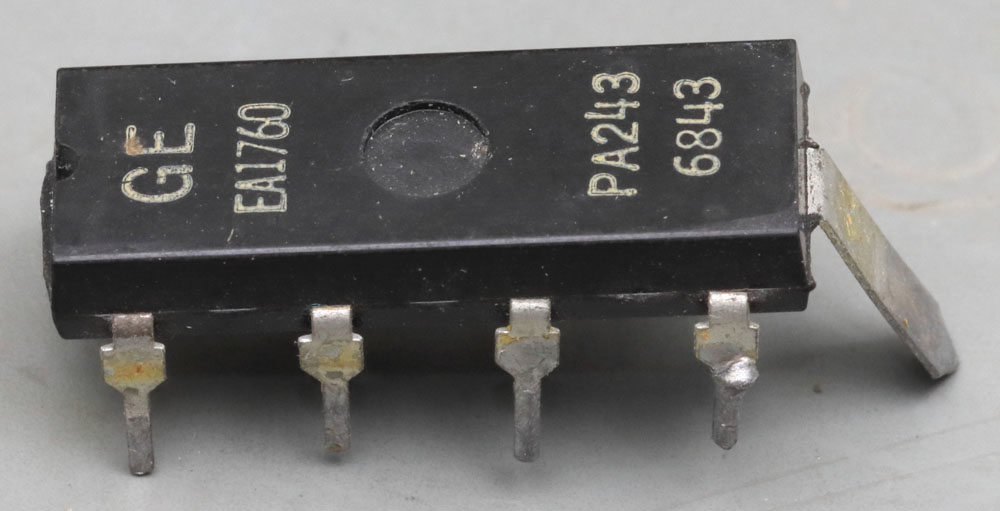
The PA243 is an audio amplifier built by General Electric. The date code refers to the year 1968. The most striking feature is the housing, which is based on a DIP-14 but has far fewer pins. Similar to Sanyo's LA4102 (https://www.richis-lab.de/audioamp02.htm) a relatively wide metal strip improves heat dissipation from the interior.


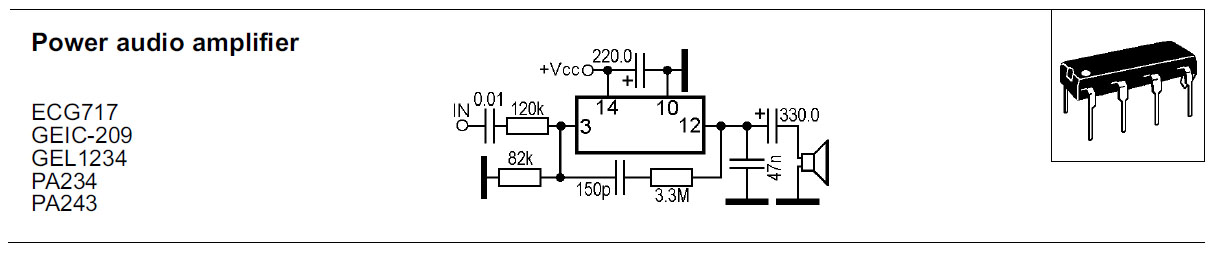
There is no datasheet for the PA243. In the "Audio Amplifiers Databook" at least an example circuit is shown and comparison types are mentioned: ECG717, GEIC-209, GEL1234 and PA234.


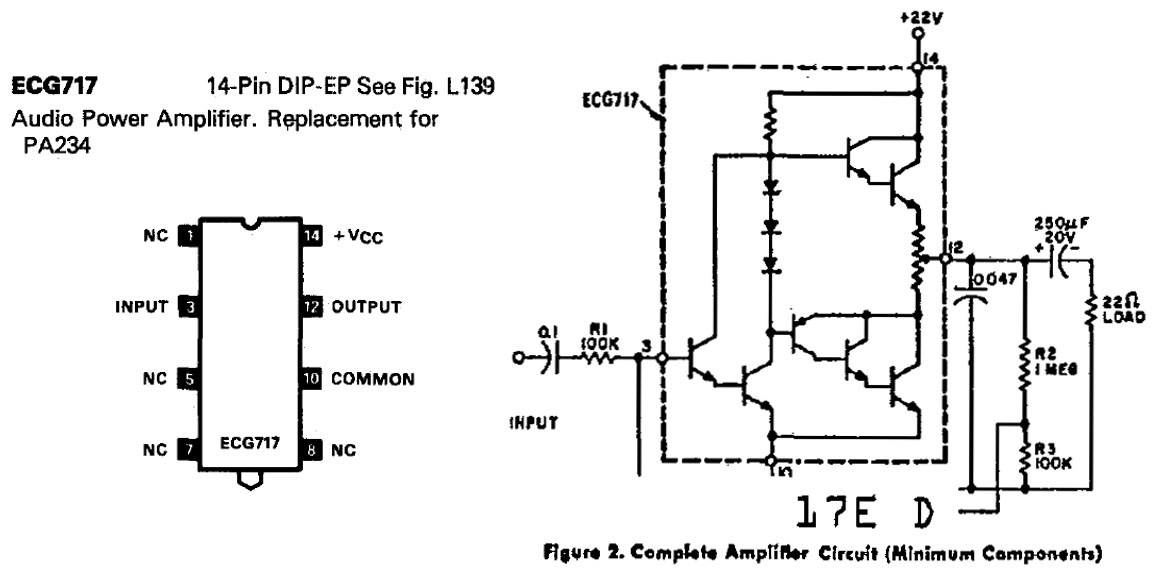
For the ECG717 a datasheet can be found. According to this, the supply voltage must be between 9V and 25V. The quiescent current is between 1mA and 15mA. The load impedance must not drop below 8Ω and is specified up to 22Ω, where 22Ω is the typical value. The output impedance is specified as 2Ω. The bandwidth is 30Hz - 100kHz (at 0,5W output power).

At 22V, the datasheet guarantees a minimum output power of 1W (3% THD typical, 10% THD maximum). Due to the low efficiency of 46% (22V, 22Ω, 1W) one has to pay attention to sufficient heat dissipation. If the heat sink of the component is kept at 50°C, up to 1,4W of power loss can be dissipated. Without this heatsink, just 0,8W is permissible even at 25°C.

The datasheet shows an example circuit too. Due to the simple supply, coupling capacitors are necessary at the input as well as at the output. The output signal is fed back via the voltage divider R2/R3. The value of the resistor R1 varies the amplification factor (2,4 - 47). The capacitor directly at the output provides the necessary high-frequency stability. The datasheet points out that this rather simple measure significantly increases the current consumption of the amplifier for signals above 15kHz.

The integrated circuit has two transistors at the input, which are an unusual Darlington pair. The collector connection of the first transistor is not directly connected to the collector of the second transistor. Between the two collectors are the three diodes, which create a certain voltage drop and thus a bias current through the output stage.

The input amplifier is immediately followed by the quasi-complementary output stage. The highside transistor consists of a Darlington circuit. On the lowside there is a Sziklay circuit, which also contains a Darlington pair inside. The PNP transistor just provides the necessary phase inversion, the current amplification is realised by the two NPN transistors.


If one removes the housing material, it becomes apparent that a gold-plated element is applied to the cooling fin, on which the die is located. From a thermal resistance point of view, the additional element is not optimal. Perhaps this design facilitated the manufacture or the different coefficients of thermal expansion made the additional element necessary.


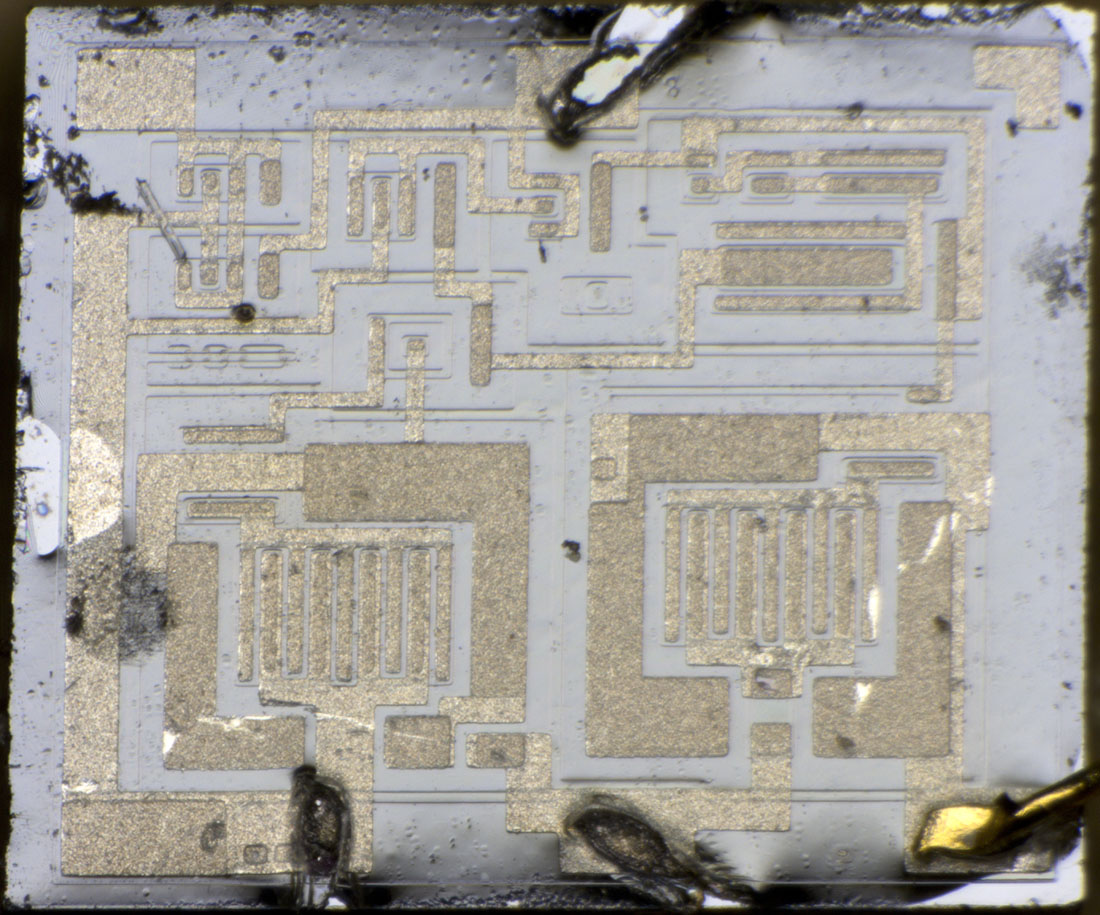
The dimensions of the die are 1,3 x 1,2mm. It is covered with a transparent but not completely clear protective layer.


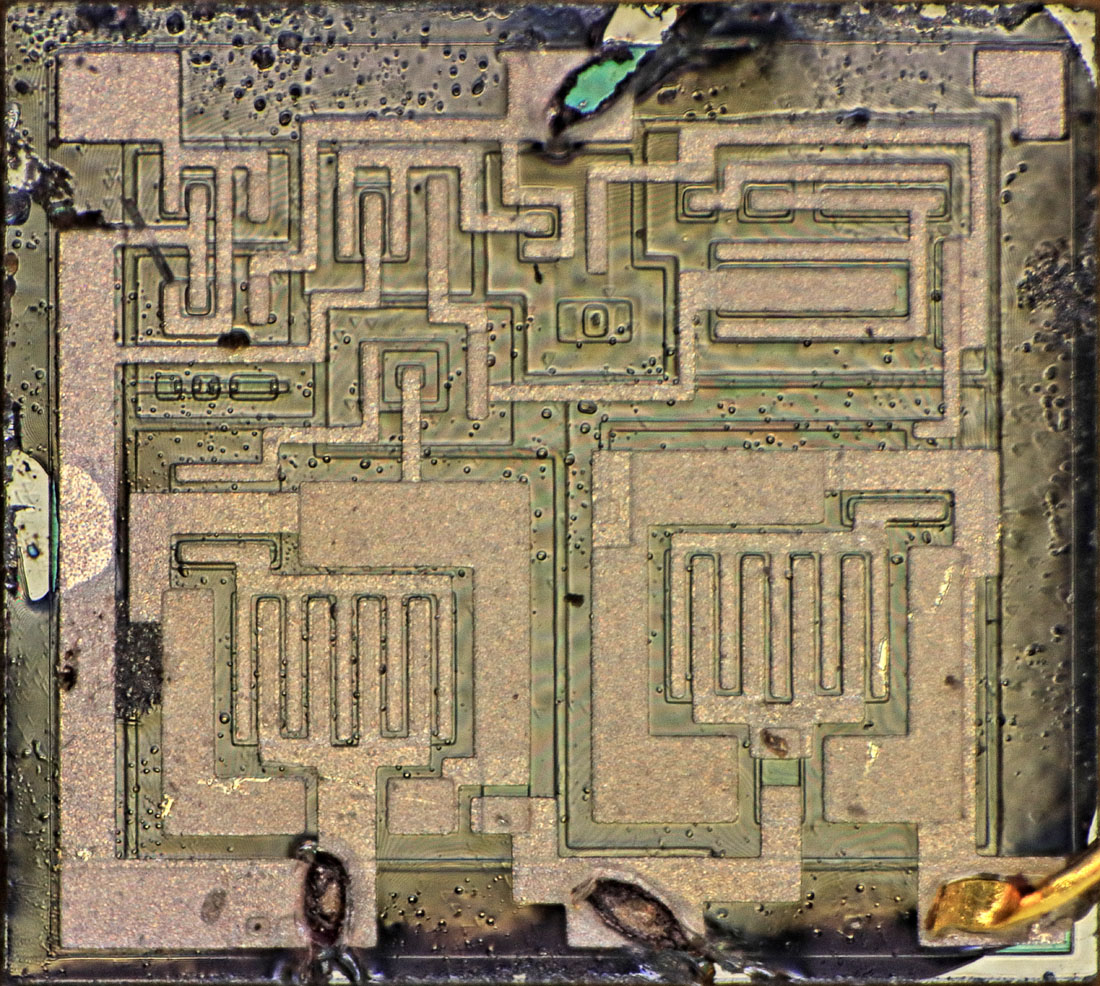
The protective layer remains stable even after a longer dwell time in a paint stripper. Only a longer dwell time in a silicone remover ultimately leads to the coating being able to be rubbed off. The structures are hardly damaged in the process. However, it turns out that the metal layer is not protected by a passivation layer. The removal of the coating resulted in scratches and minor damage in several places.


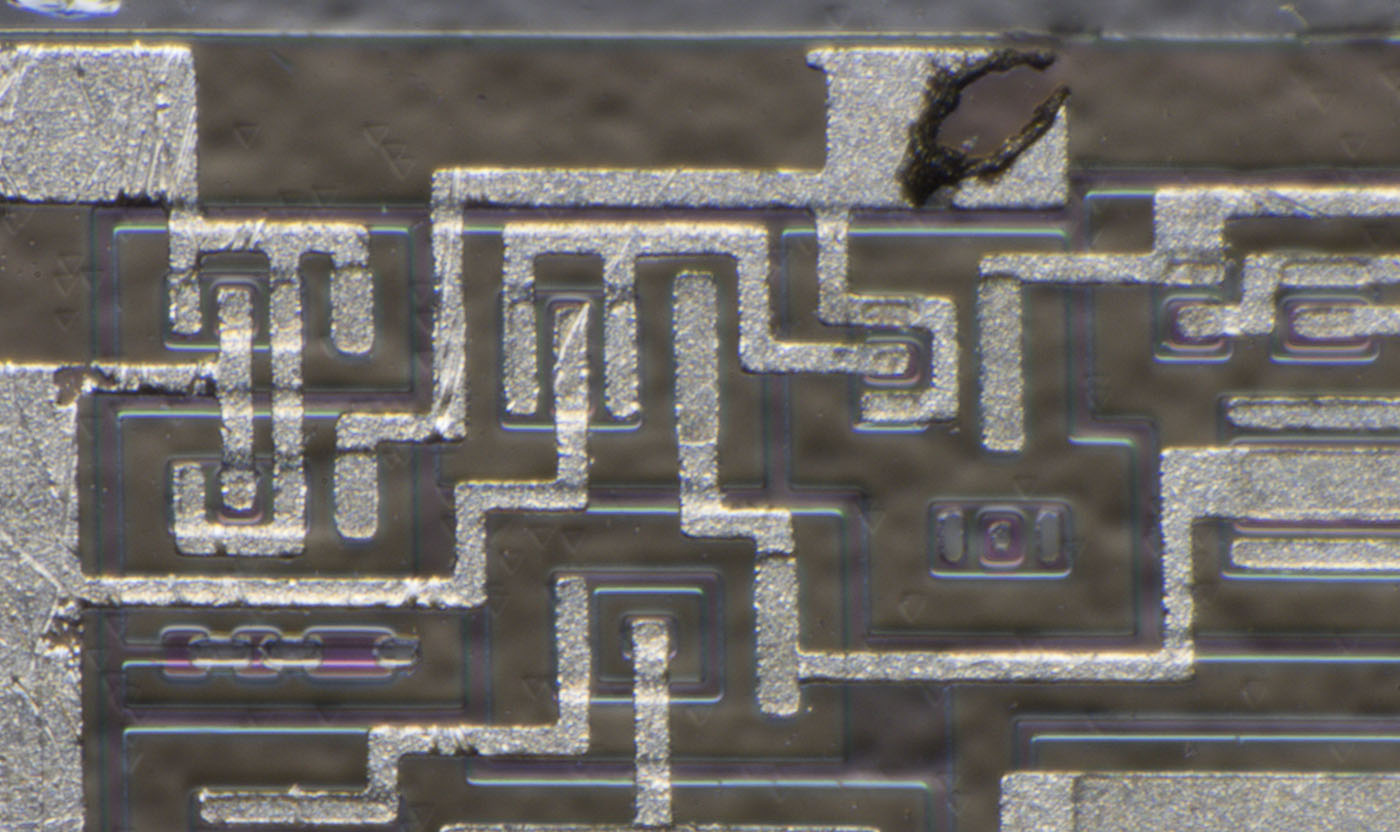
There are some irregularly distributed triangular contours on the surface of the die. These could be an artefact of an etching process.


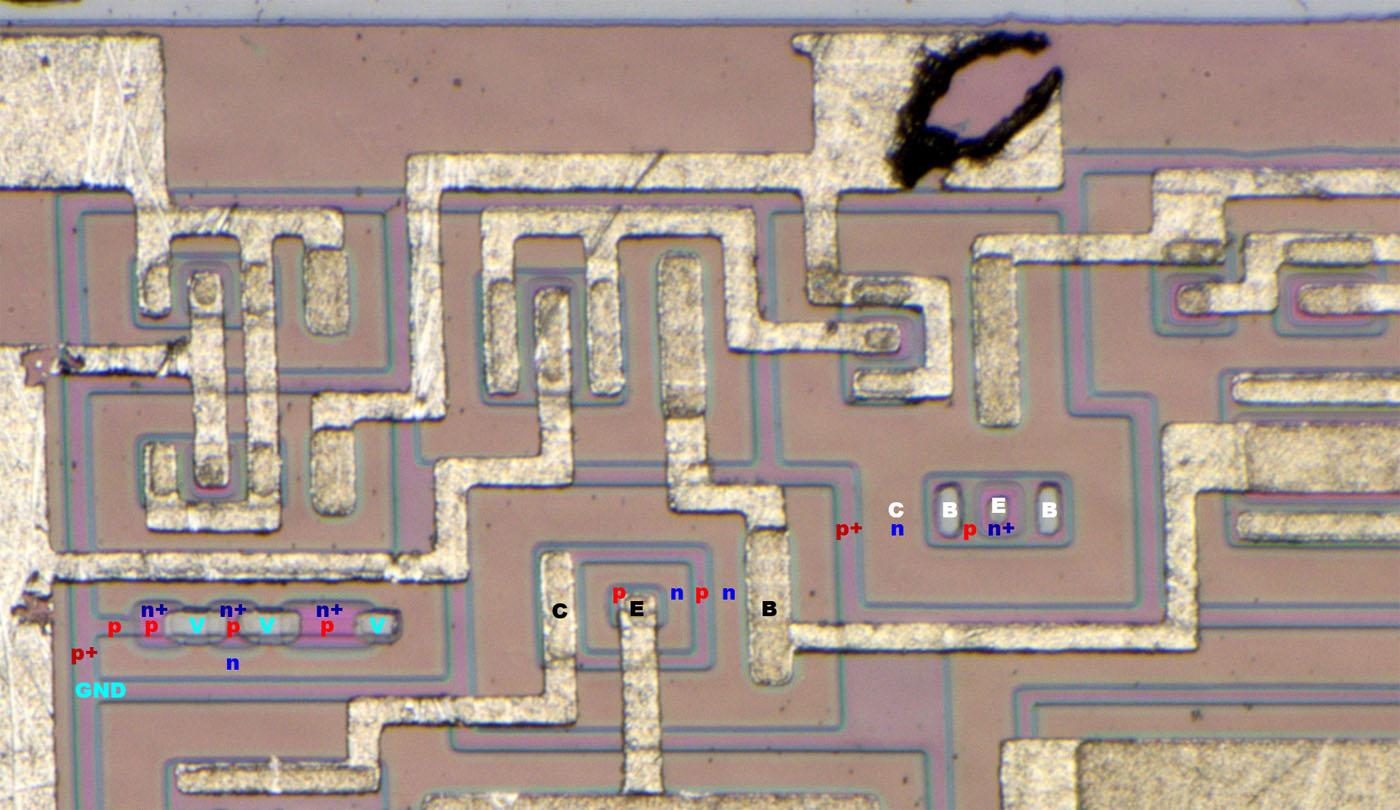
The individual elements can easily be identified. A NPN transistor, which has not been contacted, is integrated in the input area. It is located in a common n-doped collector area with the input transistor. A buried collector is not visible. Either the conductivity of the n-doping is sufficient or the buried collector do not stand out visually. The n-doped surfaces are surrounded by heavily p-doped insulation frames. A p-doped base area with two contacts is inserted into the collector surface. This base area in turn contains the heavily n-doped emitter area with the corresponding via.

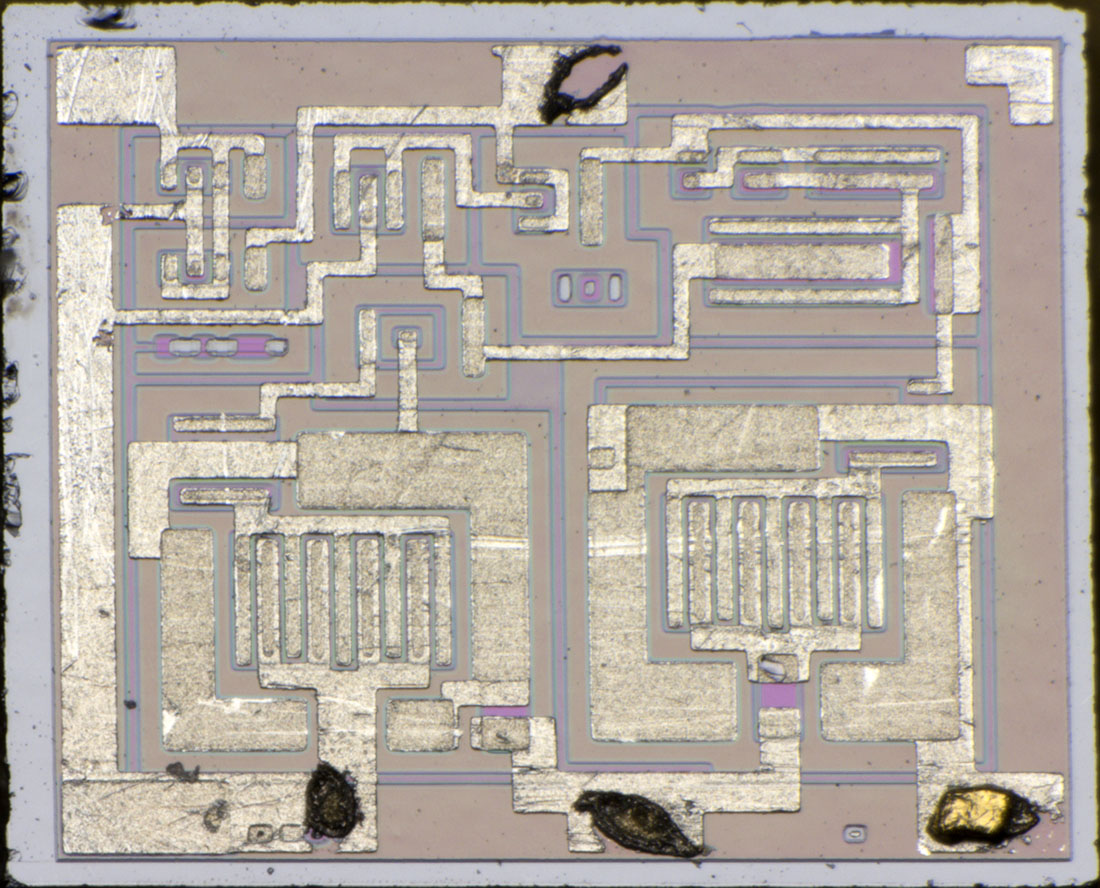
A PNP transistor is integrated to the left of the NPN transistor. This is the classic, lateral construction. The p-doping, which is otherwise used as base doping, represents the collector and emitter here. The n-doping, which is otherwise used as a collector, represents the base area here. The relatively large distances lead to the clearly worse values of a PNP transistor compared to the values of an NPN transistor.

On the left is an unused resistor. It is a pinch resistor where the base doping (p) represents the resistance, which is narrowed by a superimposed emitter doping (n+) so that the resistance value increases. On the far left, the resistor is connected to the insulation frame and thus to GND. These are three resistors connected in series, which could be contacted through three vias.


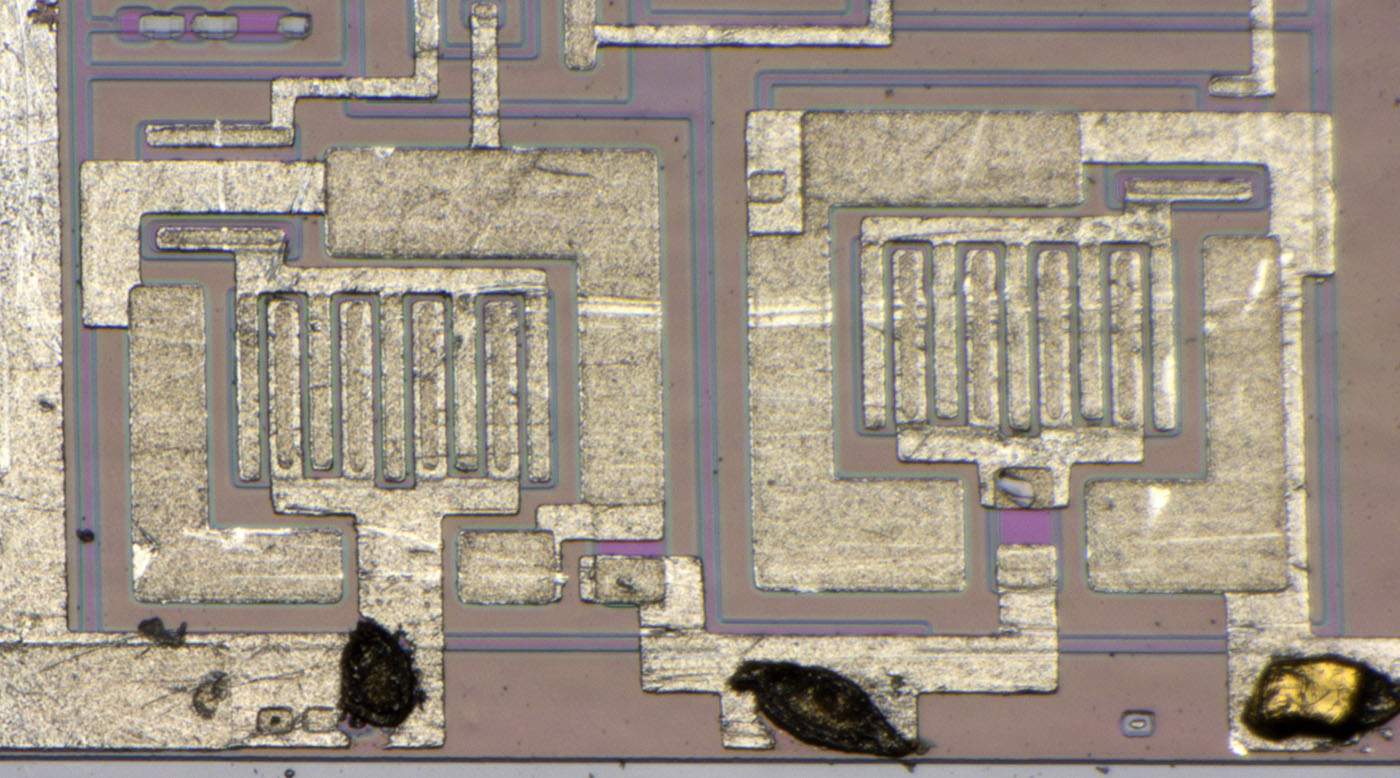
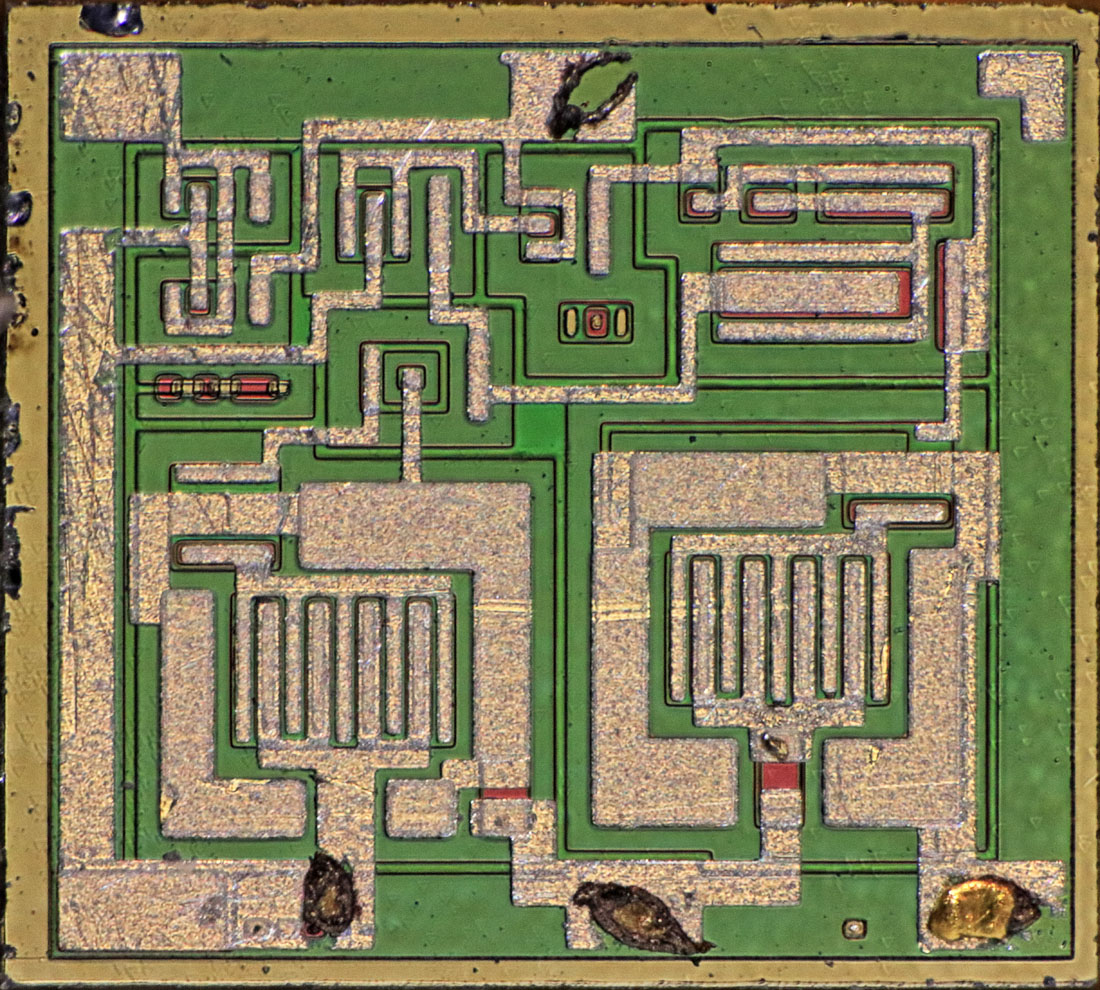
The two Darlington output stages are located in the lower area of the die. The driver transistor is integrated with the power transistor in the same collector area. The collector connection of the power transistor is massive over the whole circumference. This suggests that the collector connection is relatively inefficient. As already described, no contours of a buried collector can be seen. The base areas of the driver transistors are used to undercut the collector contacts.

The low-impedance resistors at the output consist of the heavily n-doped emitter material, which is located in base surfaces for insulation.

Several squares are integrated at the lower edge, allowing the alignment of the masks to be checked. One square is clearly visible in the right area, three more squares are located under the metal layer at the left bondpad.


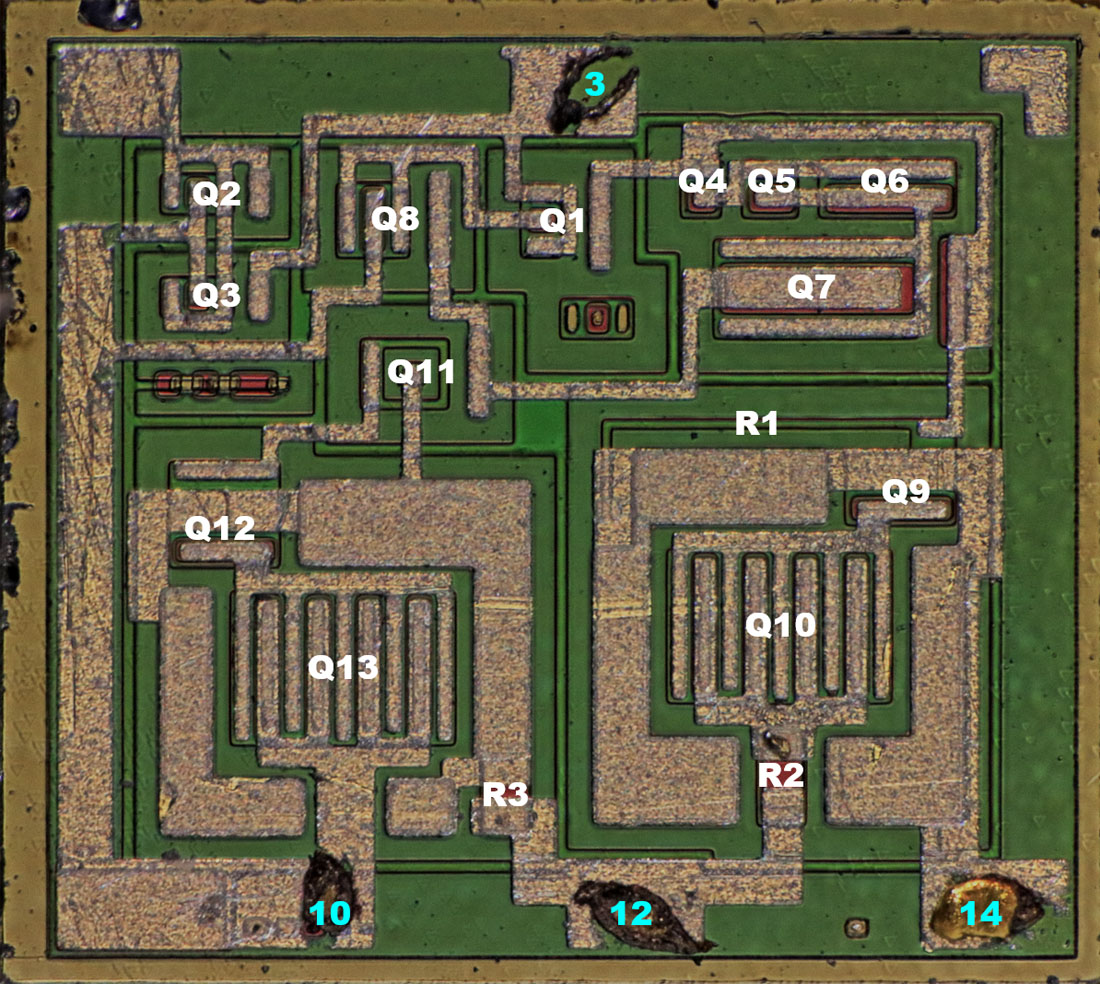
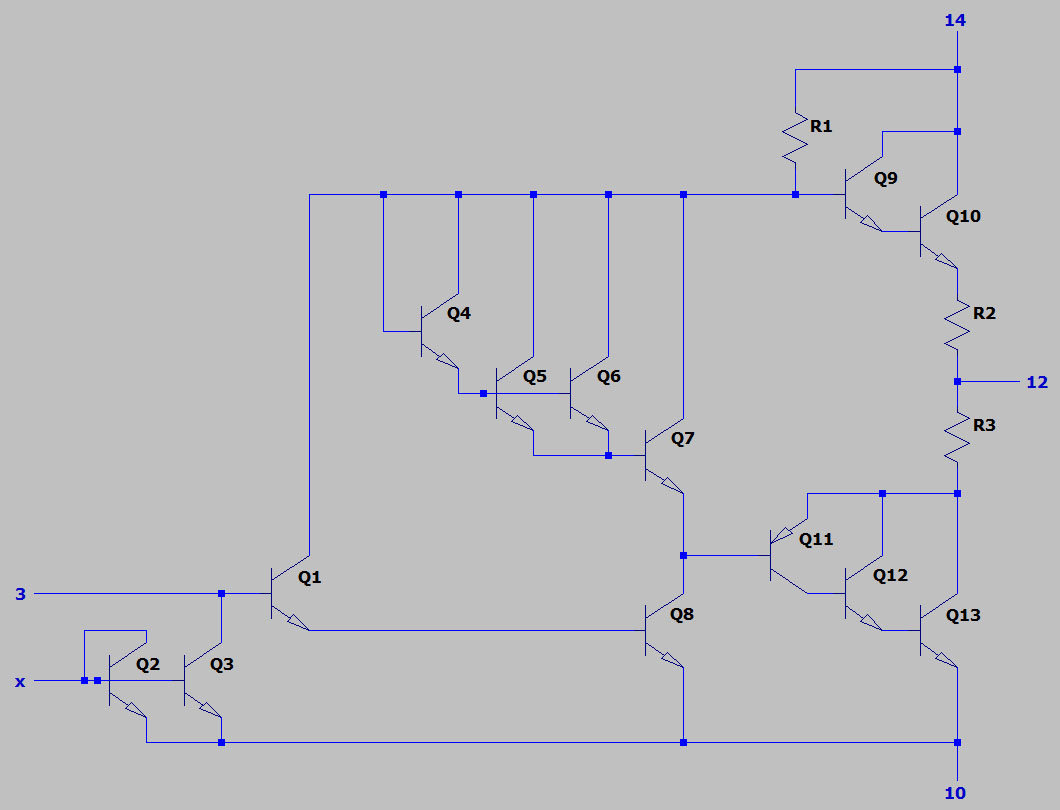
If we analyse the circuit, we see that it is broadly similar to the circuit shown in the datasheet of the ECG717. In the PA243 there is an unused bondpad connected to the two transistors Q2/Q3 at the input. This seems to be a disable circuit of the input.

The unused transistor in the collector area of the input transistor Q1 could be a hold-off to add a third transistor to the Darlington pair Q1/Q8 to further increase the gain.

The diodes for setting the bias current are represented by four transistors of different sizes (Q4-Q7). This way, you can adjust the voltage drop and thus the bias current with a variation of the metal layer.


https://www.richis-lab.de/audioamp06.htm

 :-/O
 
The following users thanked this post: SeanB, doktor pyta, RoGeorge, jbeng

Offline NoopyTopic starter

  • Super Contributor
  • ***
  • Posts: 1824
  • Country: de
    • Richis-Lab
Re: Different die pictures
« Reply #291 on: May 23, 2023, 06:44:03 pm »


Everybody knows this IR thermometer, which is labeled for a lot of different "manufacturer". Most of the time it is called DT8380. It measures temperatures between -50°C and 380°C with an accuracy of +/-2°C. There is a 9V block battery in the handle.


There are two openings on the front of the thermometer. A laser shines through the small opening and marks the spot where the temperature is meassured. The large opening forms the optical path through which the infrared radiation is guided into the interior of the thermometer.


The assembly for determining the infrared light intensity is relatively long. The cylinder ensures that lateral stray light disturbs the measurement as little as possible. Lenses for infrared radiation are often made of germanium or silicon (see for example Flir Lepton 2.5: https://www.richis-lab.de/Opto04.htm). In the case of the thermometer here, a less expensive plastic lens was sufficient. The Fresnel structure is clearly visible.


A small circuit board is screwed onto the back of the module, from which three wires lead away.


The board contains the IR sensor element in a TO package.


Apart from the aiming laser and temperature sensor, all electronic components of the thermometer are integrated on one circuit board. On one side, the board carries the LCD and three buttons for configuring the thermometer. To the left, the plastic of the LCD frame covers two LEDs that are the backlight of the display. On the other side of the board is the button that triggers the measurement.


The microcontroller, which controls the thermometer, was bonded directly to the pcb and protected from environmental influences with a black potting compound. Underneath, a T24C02A EEPROM provides 4kBit of memory. Above the microcontroller, there are conspicuously many capacitors. One can assume that the controller uses them to build up charge pumps to be able to generate the different voltages for the LCD. The controller also activates the marking laser via a transistor. Apart from some resistors and capacitors, the IR sensor is read directly without any further signal conditioning.

The unpopulated elements at the upper edge of the pcb and the corresponding labeling suggest that the board was prepared to drive a buzzer, which is powered directly from the battery. The backlight is switched by two transistors in the center of the pcb.

A Holtek HT7530-1 voltage regulator generates a stable 3V supply from the 9V battery. To detect a low battery level anyway, the battery voltage is fed to the microcontroller via a small circuit of two transistors. The transistors are marked with the strings 2A and J6. J6 stands for the NPN transistor S9014 from BL Galaxy Electrical, which was used more often on the pcb. 2A is the SMD code for the PNP transistor MMBT3906, which is produced by several manufacturers. It seems quite likely that this transistor is also built by BL Galaxy Electrical.

Several vias are placed on the left edge and in the lower left corner. Vss and Vdd obviously power the circuit. Vpp usually refers to a higher supply voltage needed to program a device. The T24C02A does not require an elevated programming voltage. It is likely that this voltage can be used to program the microcontroller. RST is obviously the reset input of the controller. The potential PT20 leads to the on/off button and thus enables switching on with a control signal.

It is quite possible that after the thermometer is produced, software is loaded or a test is performed via this interface. A data interface cannot be recognized directly. However, it is possible that certain potentials, such as PT20, have a dual function and are used for data transmission.

The labeling of the contacts on the left edge shows that a calibration can be carried out over it. This area of the board can be reached through the battery compartment in the handle. The potential leads directly to the microcontroller.


The microcontroller is integrated on a die with an edge length of 2,4mm. I can´t tell what kind of component or manufacturer it is. Apart from the usual functions, this microcontroller also needs the charge pumps to supply the LCD and the appropriate outputs to control the LCD. Perhaps the controller was manufactured especially for this application.


The only designations found on the die are the character pairs 21 and A5 in the upper right corner and seven mask revisions in the lower right corner. Judging by the colors and textures, these are three metal layers and their contacting areas.


Despite the high integration density, you can clearly see the irregular structure of a large logic block in the upper area on the left. On the right is a large memory area.


In detail, you can see the regular horizontal supply lines in the logic area, which are fed from both sides. A large number of signal lines lead downwards.


The memory area contains a large regular area flanked on two sides by relatively wide, structurally divergent circuits. This is probably an EEPROM. Usually, conspicuous charge pumps are needed to write to an EEPROM (see for example the 24xx04: https://www.richis-lab.de/ROM05.htm). Here there are no charge pumps to be seen. This fits with the fact that the interface on the board offers a connection for a programming voltage Vpp.


In the lower half of the die, some different function blocks are integrated. The dense, regular structures in the right part could represent memory areas. The different structures contain at least the drivers for the charge pumps to supply the LCD, an ADC to read the sensor and the auxiliary circuits required by the microcontroller to operate.


In the left corners, two structures are placed surprisingly far out. The upper element could be an oscillator.


More pictures coming soon...  ;)


https://www.richis-lab.de/DT8380.htm

 :-/O
 
The following users thanked this post: SeanB, TurboTom, RoGeorge

Offline T3sl4co1l

  • Super Contributor
  • ***
  • Posts: 21966
  • Country: us
  • Expert, Analog Electronics, PCB Layout, EMC
    • Seven Transistor Labs
Re: Different die pictures
« Reply #292 on: May 24, 2023, 09:11:49 am »
Hmm, charge pump might not be needed if there's VPP (high voltage programming) available?

Also EEPROM vs. Flash, what's the difference?  EEPROM would be weird given the onboard part, but code storage can be just whatever.

Tim
Seven Transistor Labs, LLC
Electronic design, from concept to prototype.
Bringing a project to life?  Send me a message!
 

Offline NoopyTopic starter

  • Super Contributor
  • ***
  • Posts: 1824
  • Country: de
    • Richis-Lab
Re: Different die pictures
« Reply #293 on: May 24, 2023, 09:21:52 am »
Hmm, charge pump might not be needed if there's VPP (high voltage programming) available?

Exactly. That would fit perfectly: No charge pump but a Vpp connection to program the microcontroller.


Also EEPROM vs. Flash, what's the difference?  EEPROM would be weird given the onboard part, but code storage can be just whatever.

Probably the missing "memory charge pump" made it necessary to integrate some external memory. If you want to do a calibration you need a possibility to save some numbers without Vpp available.

Offline Georgy.Moshkin

  • Regular Contributor
  • *
  • Posts: 158
  • Country: hk
  • R&D Engineer
    • How to become a Tech Sponsor
Re: Different die pictures
« Reply #294 on: May 24, 2023, 09:55:12 am »
In the upper right corner, where the copyright is displayed on the 78132, the U80703 has a small silicon art that appears profound. On the left, one has integrated a clock that shows 7 minutes to 12. To the right, a stick figure holds the house of a snail. What the element above the snail's shell means remains unclear. It could be a crane.  :-//
My first impression was that a person pushes a snail to make calculations faster, but it does not help much. Element above snail's shell may be a single bit of information. Snail transports ones and zeroes, and currently it is "1".
Disappointed with crowdfunding projects? Make a lasting, meaningful impact by becoming a Tech Sponsor today. Visit TechSponsor.io to Start Your Journey!
 

Offline NoopyTopic starter

  • Super Contributor
  • ***
  • Posts: 1824
  • Country: de
    • Richis-Lab
Re: Different die pictures
« Reply #295 on: May 24, 2023, 04:10:32 pm »
In the upper right corner, where the copyright is displayed on the 78132, the U80703 has a small silicon art that appears profound. On the left, one has integrated a clock that shows 7 minutes to 12. To the right, a stick figure holds the house of a snail. What the element above the snail's shell means remains unclear. It could be a crane.  :-//
My first impression was that a person pushes a snail to make calculations faster, but it does not help much. Element above snail's shell may be a single bit of information. Snail transports ones and zeroes, and currently it is "1".

That's an interesting interpretation.
Some friends of mine are still trying to investigate the people that were involved in the development to ask them about this picture. Unfortunately it's unclear if they are lucky enough to find an answer.

Offline TurboTom

  • Super Contributor
  • ***
  • Posts: 1405
  • Country: de
Re: Different die pictures
« Reply #296 on: May 24, 2023, 11:27:06 pm »
Seems like this once useful instument also suffered the ubiquitious "planned obsolescense" problem in form of a rubberized coating of the casing that after a few years turns into a sticky sludge... Over the years I fell victim to this trap several times with (not only) alleged bargain purchases (even premium brand cars use this rubbish on internal plastic parts, albeit there they tend to last somewhat longer, but still not long enough...). This made me quite "allergic" to this kind of surface treatment -- unfortunately, when buying online, it's difficult to tell about the surface treatment used. Too bad our "western" economy apparently needs such shams.

Noopy, thanks for the enjoyable microphotographs and the corresponding explanations! I really appreciate your effort a lot.  :-+
 
The following users thanked this post: SeanB

Offline NoopyTopic starter

  • Super Contributor
  • ***
  • Posts: 1824
  • Country: de
    • Richis-Lab
Re: Different die pictures
« Reply #297 on: May 25, 2023, 03:04:30 am »
Seems like this once useful instument also suffered the ubiquitious "planned obsolescense" problem in form of a rubberized coating of the casing that after a few years turns into a sticky sludge...

Absolutely right...


Noopy, thanks for the enjoyable microphotographs and the corresponding explanations! I really appreciate your effort a lot.  :-+

Thanks for the positive feedback!  :)


I think I found the controller of this device (to be honest someone gave me a hint). It seems like it is a SD8709 or at least it is very similar. I have attached the datasheet.  :-/O

Online magic

  • Super Contributor
  • ***
  • Posts: 6915
  • Country: pl
Re: Different die pictures
« Reply #298 on: May 25, 2023, 08:28:55 am »
Seems like this once useful instument also suffered the ubiquitious "planned obsolescense" problem in form of a rubberized coating of the casing that after a few years turns into a sticky sludge...

Absolutely right...
I had a "gaming" mouse with this problem and I found that the sticky crap can be removed chemically.
I'm 99% sure it was acetone, or maybe IPA which is likely the first thing I would try and which probably wouldn't work very well.
Beware that acetone damages some plastics (ABS notably, to my surprise also some PVC).
 

Offline NoopyTopic starter

  • Super Contributor
  • ***
  • Posts: 1824
  • Country: de
    • Richis-Lab
Re: Different die pictures
« Reply #299 on: June 26, 2023, 09:44:51 am »


The plastic box shown here contains an mask for the production of the A231 integrated circuit. As the labeling shows, the mask comes from the semiconductor plant Frankfurt Oder, more precisely from Markendorf. There is the year 1979 and two characters that cannot be assigned. On the back of the box, a sticker celebrates 20 years of HFO.


https://www.richis-lab.de/images/masken/01x03.jpg

The mask rests with its edges on staircase-shaped structures. A foam fixes the mask in the housing.


The glass has an edge length of 6,3cm and is 1,65cm thick. The structures occupy an area with an edge length of 5,3cm. On the upper edge, one has inscribed the mask with the characters A231-D-0.

As usual at that time, there is a kind of arrow in the center, which contains the designation of the device and indicates the orientation of the mask on the wafer. Two times three squares are arranged in a square around the center structure and stand out visually. These contain test structures that make it possible to check the quality of individual elements without them being influenced by surrounding circuit parts.


As will be shown later, the structures on the mask are mapped 1:1, i.e. they are the same size as the structures on the integrated circuit. A size comparison with the A210 wafer (https://www.richis-lab.de/wafer02.htm) shows that this is an exposure mask for 2" wafers. The wafer is completely exposed in one step. More modern exposure processes often use so-called steppers, in which a smaller mask exposes the wafer piece by piece. In this case there is an optical system between the wafer and the mask, so that the structures on the masks can be larger than the structures on the integrated circuit.


In the upper left corner, in a black rectangle, you can see the designation 2z112A231-D. It will be seen that the A231 shown here is a second revision. The designation A231 is clearly recognizable in the character string, the meaning of the other characters remain unclear.


In the above images, the coating is on the top of the glass plate. The handwritten markings on the upper edge are legible. The characters on the lower edge, however, are mirror-inverted.

During exposure, the coated side faces the wafer. If the glass plate were between the contours and the wafer, it would be impossible to image such small structures sharply. If something is to be imaged correctly on the wafer, then it must be applied mirror-inverted in the coating.


If the coating is photographed through the glass plate, the structures are displayed correctly. In this image, you can clearly see the relationship between the height of the glass plate and the size of the structures to be imaged.

At the bottom edge there is the string 2z112A231D-09169, which is similar to the inscription in the corner of the mask: 2z112A231-D.


The numbers 9 and 69 were painted on the non-coated side. It does not appear to be a datecode, as the oldest discoverable mentions of the A231 date back to 1978.


The coating of the mask is somewhat scratched and dirty. The smallest elements are about 8µm in size. For manufacturing such masks often chrome was used.


Here you can see the structure in the center of the mask. The string shows that this is a second revision of the A231.

In order to achieve the best possible image quality, the detailed images of the structures are taken from the coated side (left). To ensure that the structures on the mask can still be matched to those on the integrated circuit, all of the following images are mirrored (right).


The individual areas are 2,2mm x 1,7mm in size. With some background knowledge (e.g. from the A109 https://www.richis-lab.de/Opamp72.htm), the structures reveal that this is most likely the third mask of the process. It defines where the p-doping is introduced, which represents the base areas for the NPN transistors, generates the collector and emitter areas of the PNP transistors and with which resistors are generated.


The structures within the six test areas already allow conclusions to be drawn about the elements that will be integrated there.


The same test structures are integrated on the A210 wafer (https://www.richis-lab.de/wafer02.htm#test). A more detailed description of the elements can also be found there. On this wafer, the test structures are almost completed. Just the metal layer is missing.


[...]

 :-/O
 
The following users thanked this post: SeanB, RoGeorge


Share me

Digg  Facebook  SlashDot  Delicious  Technorati  Twitter  Google  Yahoo
Smf